Contents
Install
Check out the package
Svn co https://code.ros.org/svn/wg-ros-pkg/branches/trunk_cturtle/sandbox/pr2_teleop_booth ~/pr2_teleop_booth
Add it to your ROS_PACKAGE_PATH:
echo "export ROS_PACKAGE_PATH=~/pr2_teleop_booth:$ROS_PACKAGE_PATH" >> ~/.bashrc
Build the package.
rosmake pr2_teleop_booth
Bring up the robot
As with all applications, you must first bring up your robot.
Launch pr2_teleop_booth
The pr2_teleop_booth_joystick program depends on having a number of different nodes and particular controllers running. All of the requisite nodes and controllers will be brought up by launching the pr2_teleop_booth.launch file.
roslaunch pr2_teleop_booth pr2_teleop_booth.launch
Pairing
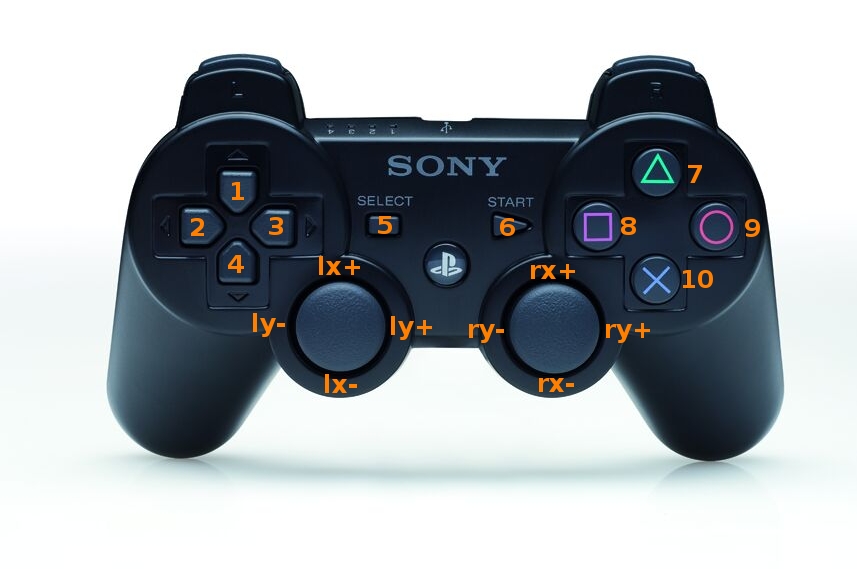
Before use, the PS3 controller must be "paired" with the robot. If your controller is not already paired, you can pair it by pressing the center button, shown in the image.
There is currently no feedback from the controller or the robot during or after pairing. The best way to tell if they have been paired correctly is to try issuing commands to the robot via the joystick as described below.

Joystick layout overview
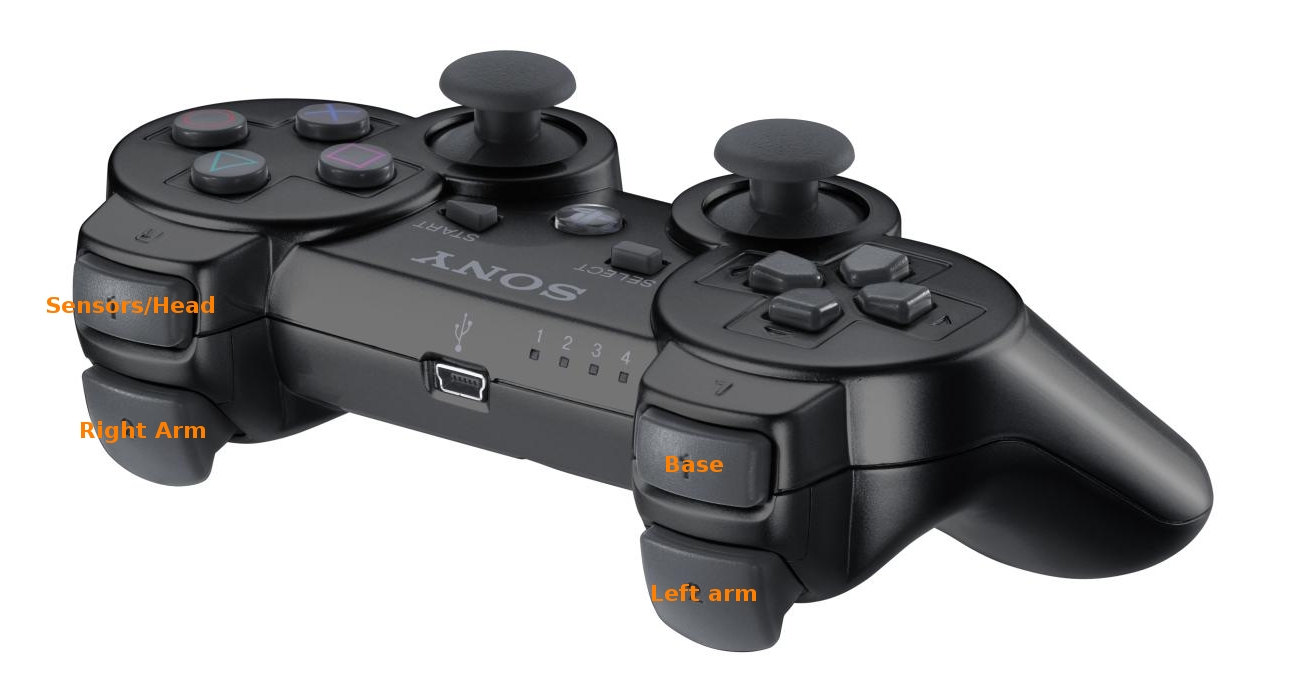
This program implements five different mapping modes for the face buttons of the ps3 joystick depending on which of the front buttons are depressed.

RVIZ control mapping
If no front buttons are depressed all commands will map to rviz control. Rviz control only will actually control rviz if a patched version of rviz is being used.
Base control mapping
In base control mode the operator can move the base or raise and lower the torso.
Sensor/Head/Follow mapping
This mode permits the operator to control the head, control the tilt of the laser, turn the projected light display on or off, and to set the "follow me" mode.
Arm control mappings
The final mappings allow the operator to control either arm independently or to control both simultaneously.

RVIZ control mapping
The rviz controller mode can control the view and the display topics enabled and disable in rviz. In order to control the view the patched rviz view selection must be set to Joy.
Please refer to the above legend for the top of the joystick to see what buttons the ids in the table labels refer to. If a button is not mentioned it is not used in a mapping.
Button |
Control Action |
1 |
Translates the rviz view up |
4 |
Translates the rviz view down |
2 |
Disables the current rviz display and enables the previous view (up in the rviz display) |
3 |
Disables the current rviz display and enables the next view (down in the rviz display) |
7 (Triangle) |
Move the rviz display selection up |
10 (X) |
Move the rviz display selection down |
8 (Square) |
Disables the currently selected display |
9 (Circle) |
Enables the currently selected display |
rx+/- |
Tilts the rviz view up/down |
ry+/- |
Rotates the rviz view left/right |
lx+/- |
Zooms the rviz view in/out |
ly+/- |
Translates the rviz view left/right |
One very useful view for 3D data is to use ly- and ry+ at the same time - this rotates the view while translating for a 3D fly around effect.
Sensor/Head/Follow mapping
Accessing this mapping requires that the upper right front button be depressed - see the above image.
Button |
Control Action |
1 |
Cycles the head mode (see below) |
2 |
Cycles the laser between Off, Slow Scan, and Fast Scan |
3 |
Toggles the projected light between off and on |
5 (Select) double-tap |
Moves the arms to follow mode position (see below) |
5 (Select) |
Exits follow mode (see below) |
6 (Start) |
Initiates follow mode if the arms are in proper position and select has been double-tapped (see below) |
ly+/- |
Pans the head right/left if in position control mode |
rx+/- |
Tilts the head up/down if in position control mode |
Head control modes
There are four control modes for the head. The first is position control, which allows the head to be tilted and panned using the analog sticks. The second and third modes point the head at the right hand hand and the left hand respectively. The final mode places the head in mannequin mode.
Follow me mode
All of this assumes that the top right front button is depressed. In order to get into follow me mode you must double-tap Select. This will move the arms into a position in front of the robot. Do not interfere with the arms as they are moving, and make sure they have clear paths. Once in position press Start in order to initiate follow me mode. The robot will nod its head if everything was successful. Otherwise it will shake its head. To exit follow me mode press Select once.
Base control mapping
The base control is accessible by pushing the top left front button. Base and torso controls are essentially the same as that described in pr2_teleop.
Button |
Control Action |
7 (Triangle) |
Raises torso |
10 (X) |
Lowers torso |
rx+/- |
Translates the robot forward/backward |
rx+/- |
Translates the robot right/left |
ry+/- |
Rotates the robot right/left |
Arm control mappings
The lower front buttons control the arms. The arms may be controlled individually by pressing only one of the front two buttons. If both arm buttons are held any commands will be issued to both arms.
Button |
Control Action |
1 |
Cycles are in between controller modes. Modes are no controllers, position control, and mannequin control |
7 (Triangle) |
Rotates the wrist or wrists counter-clockwise |
10 (X) |
Rotates the wrist or wrists clockwise |
8 (Square) |
Closes the gripper or grippers |
9 (Circle) |
Opens the gripper or grippers |
rx+/- |
When arm or arms are in position control mode, move wrist forward/back |
ry+/- |
When arm or arms are in position control mode, move wrist right/left |
lx+/- |
When arm or arms are in position control mode, move wrist up/down |
