Only released in EOL distros:
Package Summary
ROS visualization tools provided by dcgm-robotics@FIT group.
- Author: Vit Stancl (stancl@fit.vutbr.cz), Michal Spanel (spanel@fit.vutbr.cz), Tomas Lokaj
- License: LGPL
- Source: git https://github.com/ipa320/srs_public.git (branch: master)
Package Summary
ROS visualization tools provided by dcgm-robotics@FIT group.
- Author: Vit Stancl (stancl@fit.vutbr.cz), Michal Spanel (spanel@fit.vutbr.cz), Tomas Lokaj
- License: LGPL
- Source: git https://github.com/ipa320/srs_public.git (branch: master)
Package Summary
ROS visualization tools provided by dcgm-robotics@FIT group.
- Author: Vit Stancl (stancl@fit.vutbr.cz), Michal Spanel (spanel@fit.vutbr.cz), Tomas Lokaj
- License: LGPL
- Source: git https://github.com/ipa320/srs_public.git (branch: master)
Overview
The srs_ui_but stack contains tools used for information visualization in RVIZ and interactive manipulation with robot components.
System architecture
It consists of 4 components:
- but_display
- but_data_fusion
- but_ogre_tools
- but_services
BUT display
This set contains additional displays and visualizers for RVIZ. The displays can be also used as an example code for display writing (but_example_pane, but_display) and as an example of RVIZ camera tracking and casting (but_camcast).
Other set of components are visualizers:
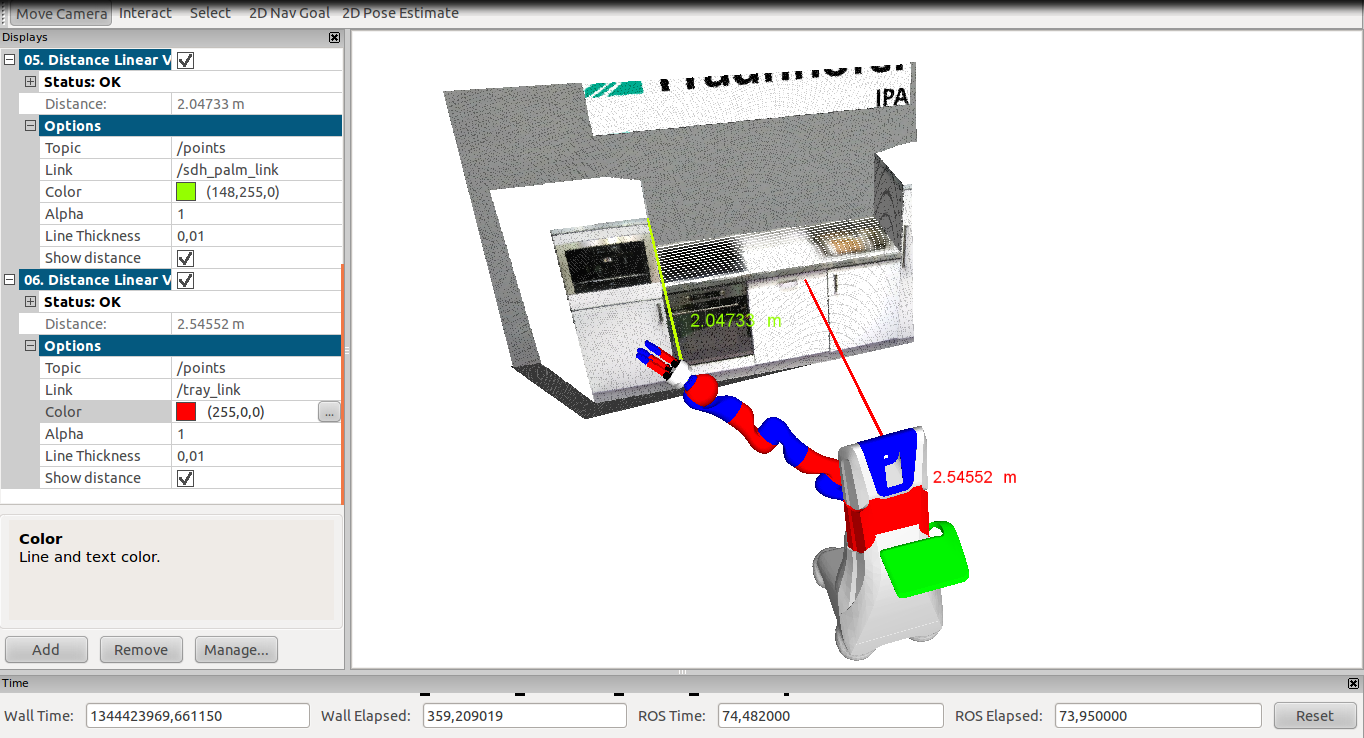
Distance Linear Visualizer
This tool visualizes distances between specified robot's link and the relevant closest point.
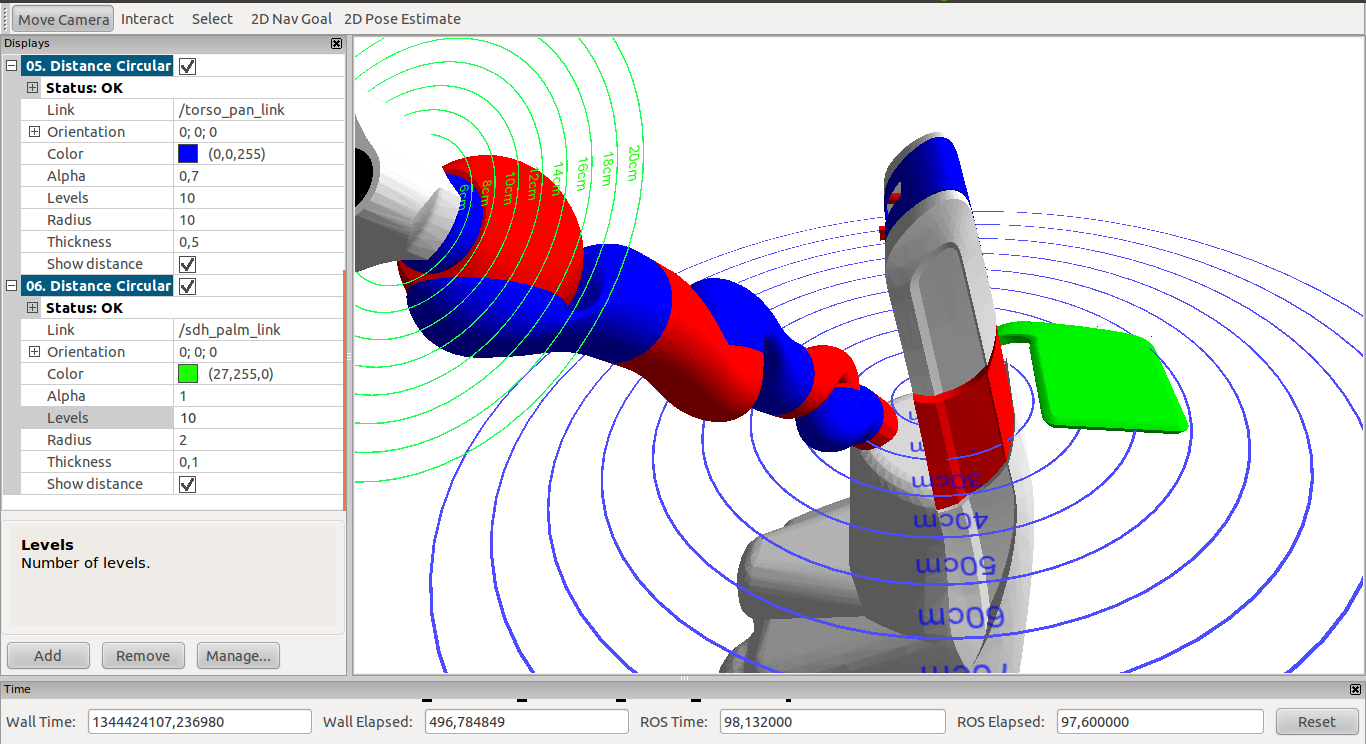
Distance Circular Indicator
This tools shows set of circles in particular distances around specified robot's link.
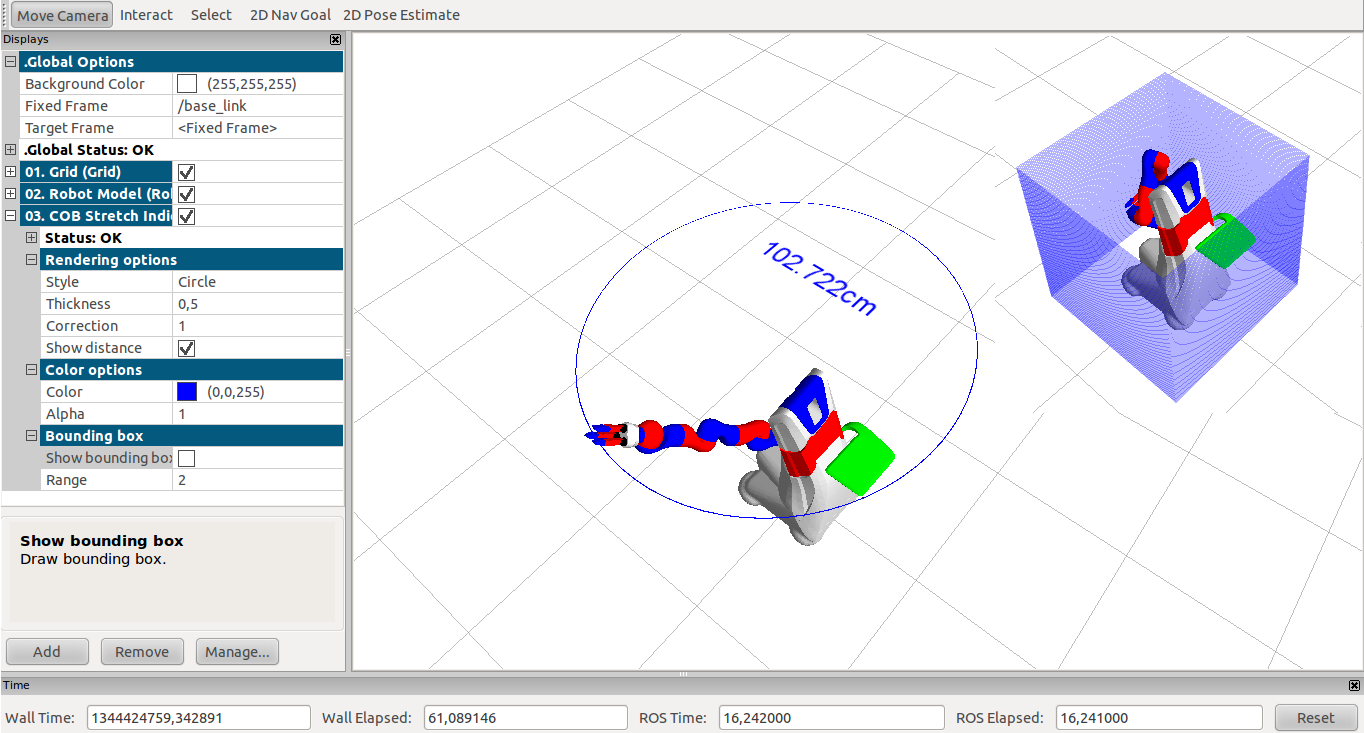
COB Stretch Indicator
This tools visualizes stretch of the Care-O-bot. It also allows to show robot's bounding box
Camera Display
Rviz display type derrived from Map Display. It awaits messages of type srs_ui_but::ButCamMsg (published by node view) with position and size of camera view polygon. It also needs topic with video stream subscribed. Video is used to draw the frames over the rectangle as its texture.
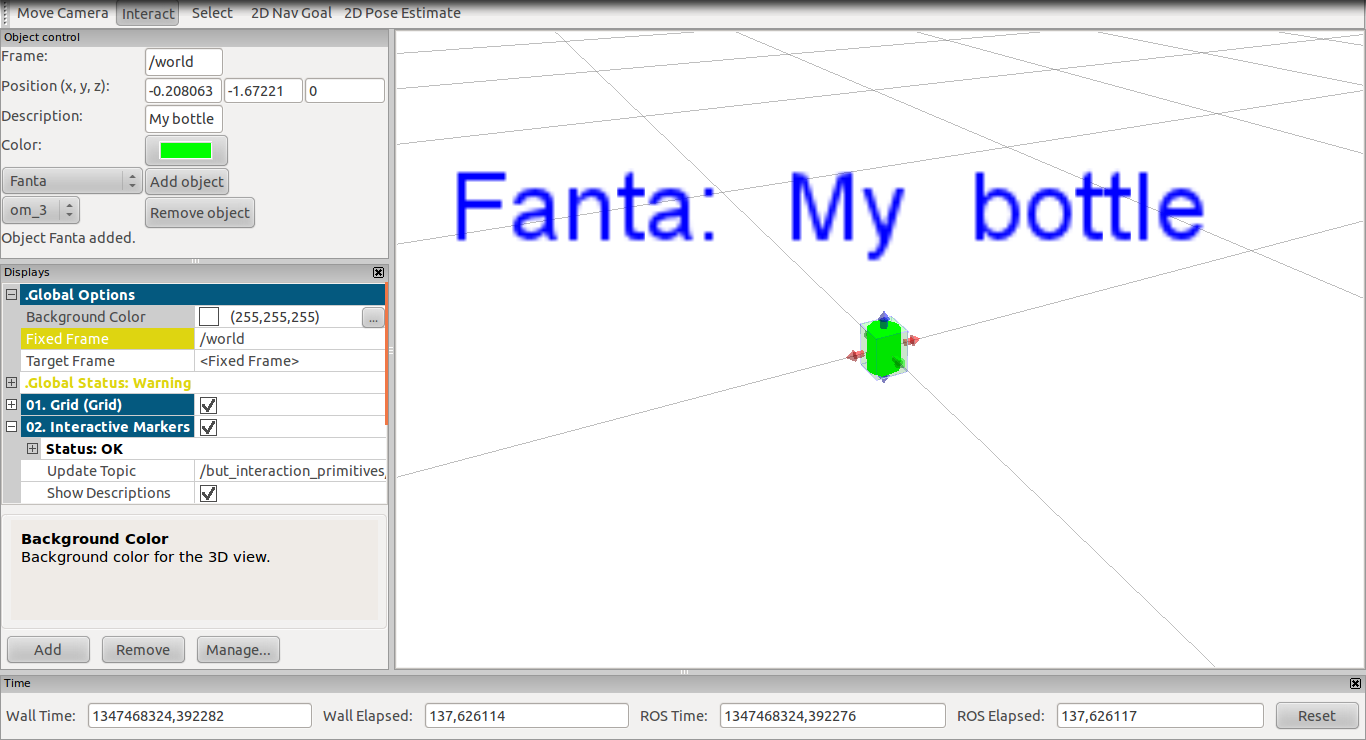
Object Manager
This tool allows to add objects stored in the srs_object_database. Objects are visualized as Object and can be moved or rotated.
Object Manager also provides service which "detects" all added objects.
Data fusion
This component experiments with 3D scene and video stream fusion, used in visualization of scene around Care-O-bot. So far there's one possibility to visualize point cloud and video from camera in one 3D view implemented. It shows view frustum in front of the robot visualized with standard Markers, and also rectangular polygon inside of this view frustum dynamically textured with current video frame.
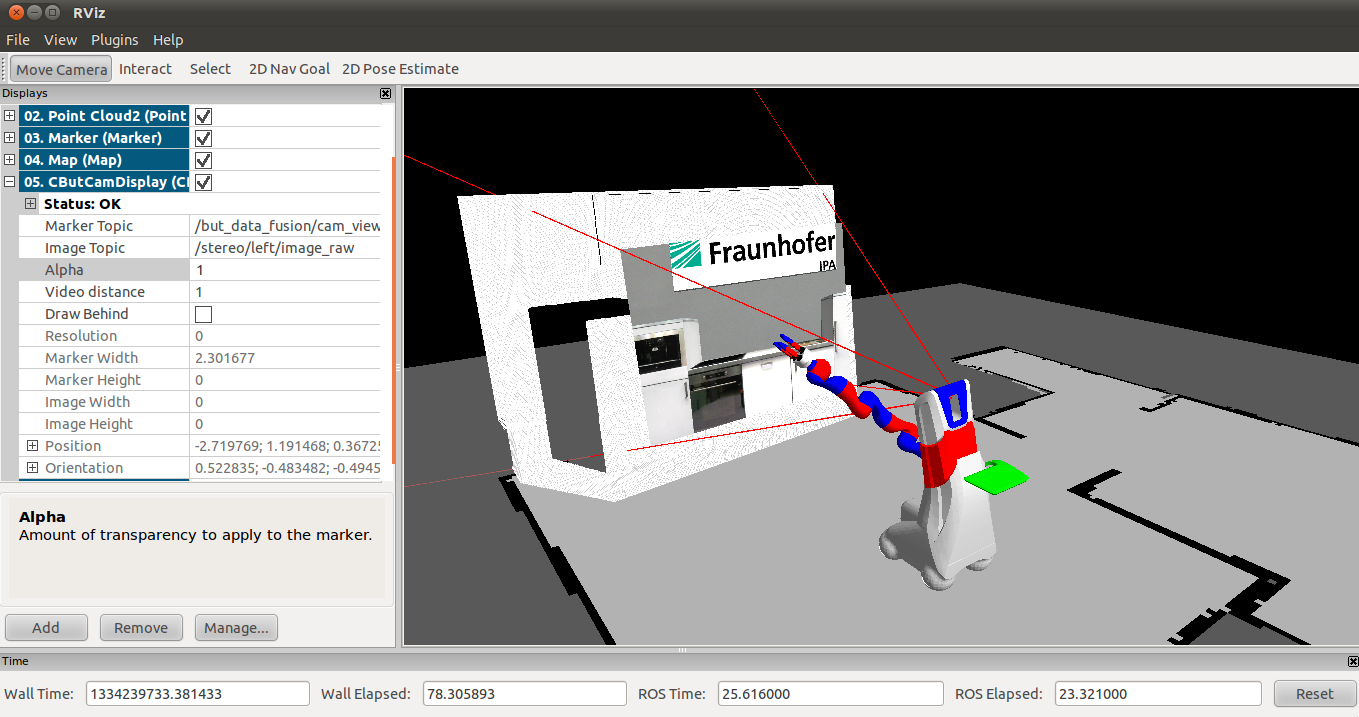
Data fusion consists of two main parts. First is node called view. This node needs to be running to succesfully visualize data fusion as it counts both view frustum and camera view polygon position and orientation in time. The other is new display CButCamDisplay described among displays.
ROS API
...brief description of provided ROS services, published topics, etc...
Nodes
An overview of all newly created ROS nodes.
Node Name |
Published Topics |
Description |
but_services_server |
|
This node publishes but services. |
cob_stretch_publisher |
|
This node publishes COB's actual stretch. |
view |
|
Counts both view frustum and camera view polygon position and orientation in time. |
Services
List of all new services.
Service Name |
Input |
Output |
Description |
/but_services/get_closest_point |
|
|
This service calculates closest point between specified robot's link and actual point cloud. |
/but_services/set_point_cloud_topic |
|
|
Sets the topic from which the closest point should be calculated. |
/but_services/get_added_objects |
|
* cob_object_detection_msgs/DetectionArray object_list
|
"Detects" all objects added by Object Manager. |
Messages
List of all newly defined messages.
Msg Name |
Content |
Description |
|
Closest point data (distance and position of the closest point). |
|
|
Reduced Marker message, covering all needs of CButCamDisplay. |
|
COBStretch |
|
Data with calculated robot's stretch. |
Published topics
List of all published topics.
Topic Name |
Message |
Description |
/but_data_fusion/view_frustum |
visualization_msgs::Marker |
Line list representing view frustum |
/but_data_fusion/cam_view |
srs_ui_but::ButCamMsg |
Geometry of camera view polygon used by CButCamDisplay display in Rviz. |
/but_services/cob_stretch |
srs_ui_but::COBStretch |
COB's stretch |
SRS API
...brief description of SRS-project specific API...
Generic states
...list of all generic states...
State Name |
Input |
Output |
Description |
name |
in |
out |
sa sadf sad |
Installation
Build package:
rosmake srs_ui_but
Distance Linear Visualizer
First you need to run but_service_server:
rosrun srs_ui_but but_services_server
Then run rviz:
rosrun rviz rviz
Load plugin and add Distance Linear Visualizer display.
Distance Circular Indicator
Run rviz:
rosrun rviz rviz
Load plugin but_gui and add Distance Circular Indicator display.
COB Stretch Indicator
First you need to run simulation and cob_stretch_publisher:
rosrun srs_ui_but cob_stretch_publisher
Then run rviz:
rosrun rviz rviz
Load plugin and add COB Stretch Indicator display.
Camera Display
Run everything together with launch file:
roslaunch srs_ui_but but_data_fusion.launch
Or launch manually all needed components:
rosrun srs_ui_but view
roslaunch cob_2dnav 2dnav.launch
Run rviz:
rosrun rviz rviz
Load plugin but_gui and add CButCamDisplay display.
Object Manager
For example usage just run
roslaunch srs_ui_but object_manager_test.launch
Configuration
...optional parameters...
- parameters
GUI Primitives for HRI
...component specific parameters...
- command
Dynamic Environment Model
...component specific parameters...
- command
Dependencies
...list of required non-standard packages, libraries, etc.
- xyz
Usage
Distance Liner Visualizer
In display properties you can set these options:
Topic - point cloud topic from which the closest point should be calculated (if you have more Distance Linear Visualizer displays, the change of the topic will affect all of them)
Link - link from which you want to show the closest point
Color - color of the line and text
Alpha - transparency of the line and the text
Line Thickness - thickness of the line
Draw distance - it will draw a text with the distance into the scene if checked.
Distance Circular Indicator
In display properties you can set these options:
Link - link from around which you want to show distance circles
Orientation - orientation of the circles
Color - color of the circles and text
Alpha - transparency of the circle and text
Levels - number of levels (circles)
Radius - distance between circles
Thickness - thickness of the circles
Show distance - it will draw a text with the distances between circles
COB Stretch Indicator
In display properties you can set these options:
Rendering options
Style - you can switch between Square and Circle
Thickness - thickness of rendered lines or circles
Correction - Radius correction due to the difference in thickness of the arm, gripper and fingers
Show distance - it will draw a text with the stretch size
Color options
Color - color
Alpha - transparency
Bounding box - with these option you can render bounding box around the robot
Show bounding box - enables bounding box rendering
Range - range between the circles or squares
Camera Display
You can optionally visualize view frustum by adding Marker display and subscribe it to /but_data_fusion/view_frustum topic.
Subscribe CButCamDisplay through Marker Topic to /but_data_fusion/cam_view. Through Image Topic you can subscribe display to any of camera topics:
- /stereo/left/image_raw
- /stereo/right/image_raw
- /cam3d/rgb/image_raw
There are basically three properties you can set, the rest is only informational:
- Alpha - Transparency of polygon with video frames (between 0.0 and 1.0).
- Video Distance - Distance of polygon between sensor and closest point cloud point (between 0.0 and 1.0; 0.0 means position of sensor, 1.0 distance of closest point cloud point, 0.5 id half way between sensor and point cloud etc.).
- Draw Behind - Remnants of Map display with the same functionality.
Object Manager
For adding new objects use Object control panel:
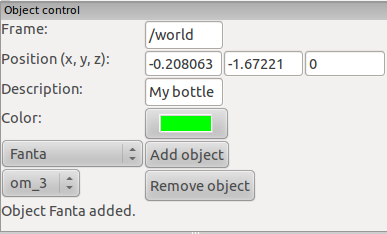
You can set these options:
Frame - Fixed Frame
Position - position where you want to put the object
Description - object's description
Color - object's color
Add object
Selected the object from the combo box and click on the button Add object.
Remove object
If you want to remove some object, just select it from the combo box and click on the Remove object button.
Note:
- Not all objects from database have their meshes in the database.
Position to place the object can be estimated by clicking into the scene with usage of the 2D Pose Estimate tool (temporary solution).
